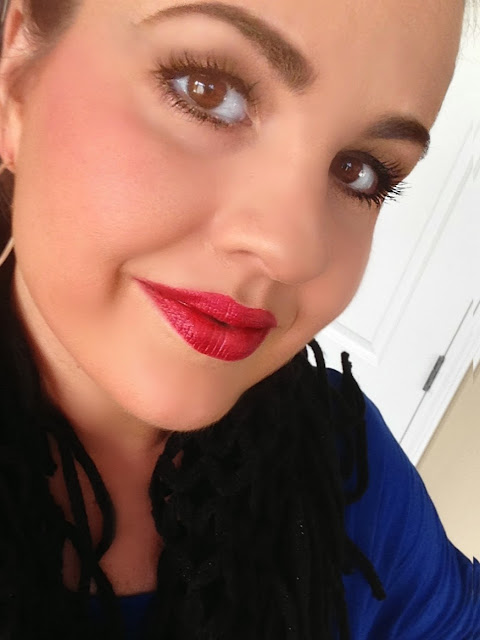
Pin Up Retro Make Up - Almost 40, so why not???
Why Not Have a Little Fun and Be a Little Bold?
Hey Everyone! I know it's been a long, long time but I thought I'd share my recent attempt at a pin up look. I see so many pretty looks on Pinterest and figured it was worth a try. I'm no artist, just your typical stay-at-home mom but I'm trying to give myself more room to be creative and try new things. I am working to let go of the fear of looking silly or making mistakes. You fail at 100% of the stuff you never try right????
My husband and I are attending a black tie event in a few weeks, my dress is kind of a retro, sexy 50's housewife, look. I wanted to try to match the make up with it so I've been practicing!
Here's the finished product:
What I Used
After going through my skin care routine, I applied the following:
Benefit "The Porefessional" pore refiner in my large pore areas
Clinique Even Better Foundation- #04 Cream Chamois
Nars Orgasm Blush
Maybelline Dream Lumi Concealor in Light
Clinique Touch Base for Eyes (Canvas)
Clinique Eye Shadow Duo in Teddy Bear
Bobbi Brown Gel Eyeliner- Black (top)
Clinique Intense Chocolate Eye Liner (bottom)
L'Oreal Double Extend Beauty Tubes Mascara
Revlon Color Stay Ultimate Liquid Lipstick in Top Tomato
Clinique Loose Translucent Powder #4, neck and perimeter
Clinique Loose Translucent Power Neutral in center/t-zone
Clinique Brow Shaper in Shaping Taupe
Step #1
"Flawless" Skin Finish by exfoliation 1st, minimizing pores (using the Porefessional and by "patting" powder in with warm fingers vs. using a brush applicator). Thorough and blended application of foundation. Concealor can quickly hide any other freckles, sun damage or "flaws". Blush is a light application on cheekbones but toward the temples, do not bring it too far into the center of your face. It should not be applied in the area between your pupil and nose. Apply bronzer or a darker powder around the perimeter of face, neck and sides of your nose. Pat a lighter powder on the top of nose, entire t-zone and center of face. Using your warm hands, press down moving quickly over all areas of application. This helps to warm and melt the powder into your skin. This method has the benefit of minimizing the look of your pores, giving better coverage and longer lasting results.
Step #2
Eyes! I used a Clinique Touch Base (Canvas) to prime my eye lids from lash line to eye brow. There are many lid primers out there including a new one from Clinique but this has been my favorite for as long as I can remember. Gives the best results as far as wear, coverage and showcasing true pigments from your shadow. I covered the lid lash line to brow bone in the lighter shade of the duo and then took the darker shade and followed just my crease. Once applied I took a fluffy eye shadow brush and blended by sweeping it over the darker color back and forth several times with a light touch. Eye liner application was with a brush on top (gel liner) and a pencil on the bottom which was then diffused using a thin eyeshadow brush.
Step #3
LASHES ARE KEY! I think truly for my night out I will use falsies, but for practice purposes I used my favorite, daily, big lash look. I have used L'oreal Double Extend Beauty Tubes for about 8 years now. I have tried everything out there and this is my favorite for many reasons. It comes with a primer/conditioner that helps to nourish your lashes and keep them healthy, prime your lashes and bulk them up before the color is applied. The color itself is fibrous and with proper application tends to stretch out the length a bit beyond the tips. This mascara does not flake, run or smudge. It is warm water removal so when I hop in the shower I just let the warm water run over my face, then I pull them off. They come off in goupy clumps which is unnerving at first. SO WEIRD! After time though, the benefits of not rubbing and pulling at your delicate eye area during removal add up. This time I finished off the lashes with an additional coat of Benefit "They're Real" mascara just to plump and lengthen a bit more. I feel like it made a difference.
Step #4
RED POUTY LIPS. I lined my lips with concealor and blended. I think its important to create a barrier so you can prevent bleeding and to make the outline of your lips "pop" a bit more. I applied the lipstick with a lip brush. I applied and blotted with tissues 4x before I achieved the look I was going for. This lipstick lasted all night, I used chap stick a few times to keep from drying out.
Step #5
BOLD BROWS! You can't pull this off with wimpy or thin brows. The brows are like the bow on the package, they tie it all together. The look I used is a heavier look closer to the bridge of the nose, filled in on top and bottom of the natural brow line. I tried to do a sharp arch starting just past my iris, leading out to a very thin end. I applied the shaping powder with a stiff eye liner application brush and mist the brush with water beforehand to help pick up more pigment.
So that's my look! Why leave all the fun stuff to the 20 year olds????? I got a lot of compliments and will definitely try this look again. :)


Great job!! I loooove the lip color!
ReplyDeleteThank you Love!
ReplyDelete